Automation is not just a buzzword in the cybersecurity community - it's a necessity. Discover how to elevate your security operations with my upcoming post, "Automate Response with KQL." Learn how to harness the power of Kusto Query Language to create custom detection rules and automate incident responses, transforming your SOC into a proactive and highly efficient defense mechanism.
What are the benefits of automating response with KQL
My recommendations
Conclusion
Introduction
In the realm of cybersecurity, automation is a critical component for enhancing efficiency and ensuring timely responses to threats. KQL plays a pivotal role in this automation process, especially when integrated with Microsoft Sentinel. By utilizing custom detection rules in Defender XDR and Sentinel analytic rules, security operations centers can significantly amplify their threat detection and response capabilities. This blog post delves into the power of automating response with KQL, exploring its benefits, best practices, and practical applications.
How can we automate detections made by KQL?
Automating detections in Defender XDR and Sentinel using KQL can revolutionize the way security operations centers handle threats. By defining specific criteria through custom detection rules and analytic rules, SOCs can tailor KQL queries to match their unique threat landscape. These rules can automatically trigger alerts and initiate predefined responses when suspicious activities are identified, such as multiple failed login attempts indicative of a brute-force attack.
Sentinel analytic rules further enhance this capability by enabling continuous monitoring and analysis of log data. These rules can execute automated responses, from alerting and ticket creation to isolating compromised systems or blocking malicious IP addresses. Integrating these automated processes in Defender XDR and Sentinel allows for real-time detection and swift responses, significantly enhancing the efficiency and efficacy of security operations. Embracing KQL for automation ensures that digital assets are protected with precision and agility, ultimately strengthening the overall security posture.
Custom Detection Rules
Custom detection rules in Microsoft Defender XDR allow security operations centers to define specific criteria for identifying and responding to suspicious activities. These rules utilize Kusto Query Language (KQL) queries, which can be customized to suit the unique threat landscape of an organization. By automating the detection of threats such as multiple failed login attempts, these rules help in triggering alerts and initiating predefined responses, thereby enhancing the efficiency and effectiveness of security operations.
Why and when to Use Custom Detection Rules in Defender XDR?
In the dynamic world of cybersecurity, the ability to respond swiftly and accurately to threats is paramount. While Microsoft Sentinel offers robust analytic capabilities, there might be instances where organizations have not yet integrated Sentinel into their security operations or prefer not to wait the approximately 10 minutes it can take for an incident to emerge. In such scenarios, Custom Detection Rules in Defender XDR present an invaluable alternative.
Custom Detection Rules in Defender XDR provide immediate advantages by enabling real-time detection and response. These rules empower security operations centers to define specific criteria tailored to their unique threat landscape. With this level of customization, organizations can ensure that their security measures are precise and highly effective.
How to make a Custom Detection Rules in Defender XDR
When you have to create Custom Detection Rules in Defender XDR it offers a wide array of actions that can be automatically triggered upon detecting suspicious activities.
Create the rule:
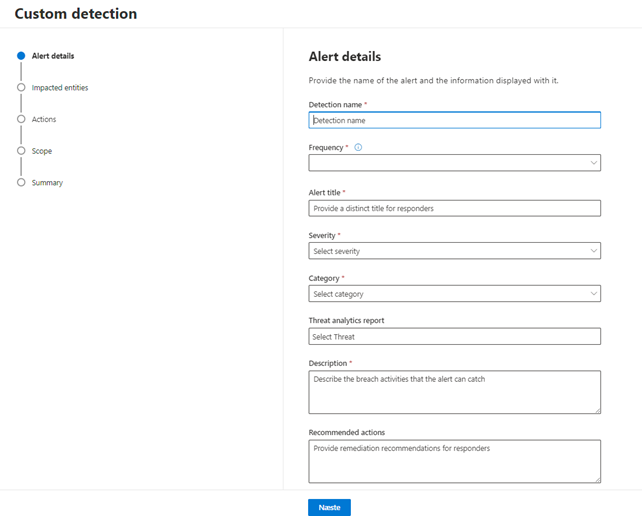
With the query in the query editor, select Create detection rule and specify the following alert details:
Detection name — name of the detection rule; should be unique
Alert title — title displayed with alerts triggered by the rule; should be unique
Severity — potential risk of the component or activity identified by the rule
Category — threat component or activity identified by the rule
MITRE ATT&CK techniques — one or more attack techniques identified by the rule as documented in the MITRE ATT&CK framework. This section is hidden for certain alert categories, including malware, ransomware, suspicious activity, and unwanted software
Description — more information about the component or activity identified by the rule
Recommended actions — additional actions that responders might take in response to an alert
Rule frequency
When you save a new rule, it runs and checks for matches from the past 30 days of data. The rule then runs again at fixed intervals, applying a lookback duration based on the frequency you choose:
Every 24 hours — runs every 24 hours, checking data from the past 30 days
Every 12 hours — runs every 12 hours, checking data from the past 48 hours
Every 3 hours — runs every 3 hours, checking data from the past 12 hours
Every hour — runs hourly, checking data from the past 4 hours
Continuous (NRT) — runs continuously, checking data from events as they're collected and processed in near real-time (NRT), see Continuous (NRT) frequency
Ensure that the time filters in your query align with the lookback duration. Results outside of this duration will be disregarded.
When a rule is edited, it will execute with the applied changes at the next scheduled run time, according to the set frequency. The frequency of the rule is determined by the event timestamp rather than the ingestion time.
Continuous (NRT) frequency
Running custom detection in Continuous (NRT) frequency helps your organization identify threats faster with minimal impact on resource usage. Consider this frequency for any qualified custom detection rule.
Specify the actions needed:
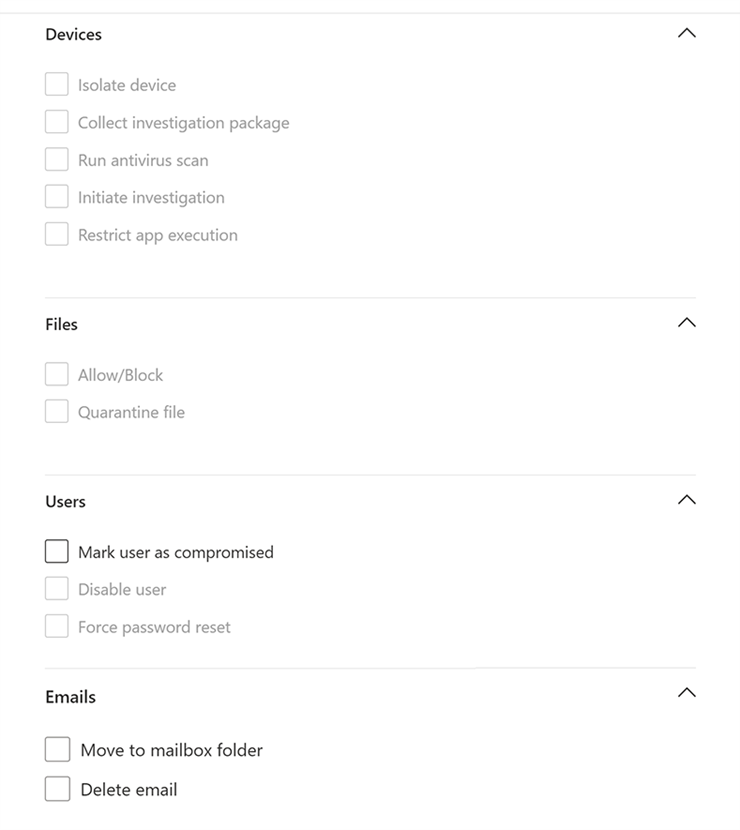
Actions on devices
These actions are applied to devices in the DeviceId column of the query results:
The Allow/Block action can be applied if you have Remediate permissions and a file ID like an SHA1. Blocking a file will block it across all devices. You can specify device groups, but not individual devices.
The Quarantine file action can be applied to files in the SHA1, InitiatingProcessSHA1, SHA256, or InitiatingProcessSHA256 columns of the query results. This action removes the file and places a copy in quarantine.
Actions on users
When the "Mark user as compromised" action is selected, it is applied to users identified in the AccountObjectId, InitiatingProcessAccountObjectId, or RecipientObjectId columns of the query results. This action sets the users' risk level to "high" within Microsoft Entra ID, thereby activating corresponding identity protection policies.
Select Disable user to temporarily prevent a user from logging in.
Select Force password reset to prompt the user to change their password on the next sign in session.
Both the Disable user and Force password reset options require the user SID, which are in the columns AccountSid, InitiatingProcessAccountSid, RequestAccountSid, and OnPremSid.
If the custom detection yields email messages, you can select Move to mailbox folder to move the email to a selected folder (any of Junk, Inbox, or Deleted items folders). Specifically, you can move email results from quarantined items (for instance, in the case of false positives) by selecting the Inbox option.
Alternatively, you can select Delete email and then choose to either move the emails to Deleted Items (Soft delete) or delete the selected emails permanently (Hard delete).
Set the rule scope
Set the scope to specify which devices are covered by the rule. The scope influences rules that check devices and doesn't affect rules that check only mailboxes and user accounts or identities.
When setting the scope, you can select:
All devices
Specific device groups
Only data from devices in the scope will be queried. Also, actions are taken only on those devices.
By leveraging these automated actions, Custom Detection Rules in Defender XDR not only enhance the responsiveness and effectiveness of security operations but also contribute to a more resilient and proactive security posture. This proactive approach ensures that organizations can stay ahead of potential threats, safeguarding their digital assets with agility and precision.
Sentinel Analytic Rules
Sentinel analytic rules leverage KQL to perform continuous monitoring and analysis of log data. These rules are designed to automatically detect and respond to threats by executing predefined actions when certain conditions are met. By using analytic rules, SOCs can automate routine tasks such as alerting, ticket creation, and even initiating automated responses like isolating compromised systems or blocking malicious IP addresses.
Get started creating a scheduled query rule
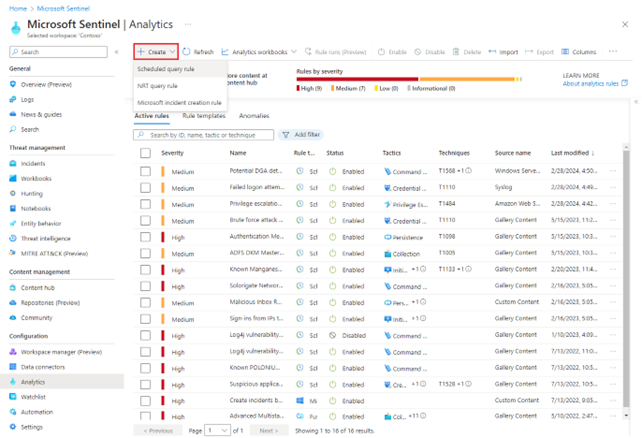
To get started, go to the Analytics page in Microsoft Sentinel to create a scheduled analytics rule.
For Microsoft Sentinel in the Azure portal, under Configuration, select Analytics. Select +Create and select Scheduled query rule.
Name the rule and define general information
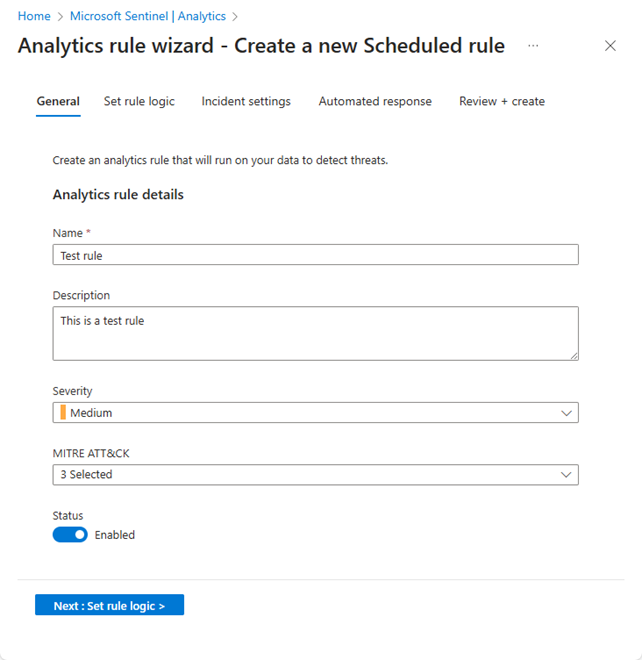
Enter the following information for your rule.
Name: A unique name for your rule.
Description: A free-text description for your rule.
Severity: Match the impact the activity triggering the rule might have on the target environment, should the rule be a true positive.
Informational: No impact on your system, but the information might be indicative of future steps planned by a threat actor.
Low: The immediate impact would be minimal. A threat actor would likely need to conduct multiple steps before achieving an impact on an environment.
Medium: The threat actor could have some impact on the environment with this activity, but it would be limited in scope or require additional activity.
High: The activity identified provides the threat actor with wide ranging access to conduct actions on the environment or is triggered by impact on the environment.
MITRE ATT&CK: Choose those threat activities which apply to your rule. Select from among the MITRE ATT&CK tactics and techniques presented in the drop-down list. You can make multiple selections.
Status: Enabled: The rule runs immediately upon creation, or at the specific date and time you choose to schedule it (currently in PREVIEW).
Disabled: The rule is created but doesn't run. Enable it later from your Active rules tab when you need it.
Select Next: Set rule logic.
Define the rule logic
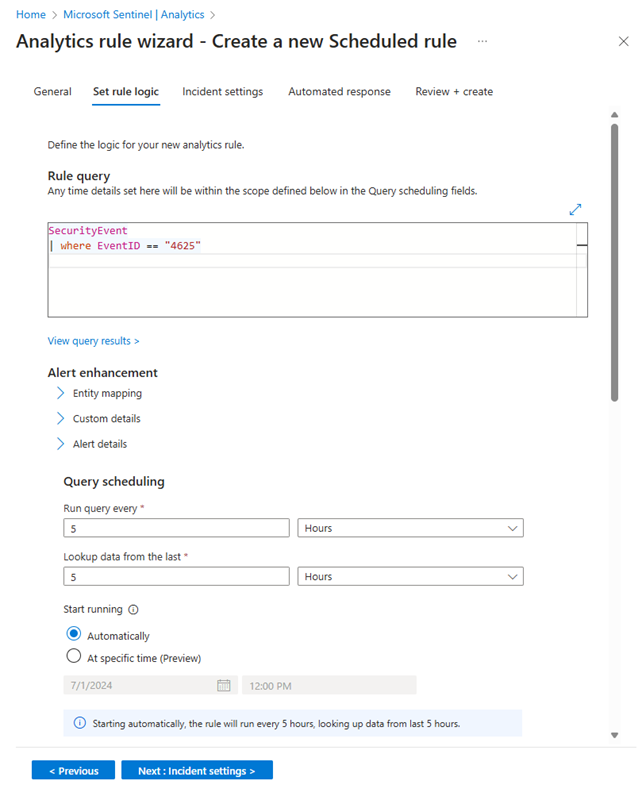
The next step is to set the rule logic which includes adding the Kusto query that you created.
Enter the rule query and alert enhancement configuration.
Rule query: Paste the query you designed, built, and tested into the Rule query window. Every change you make in this window is instantly validated, so if there are any mistakes, you’ll see an indication right below the window.
Map entities: Expand Entity mapping and define up to 10 entity types recognized by Microsoft Sentinel onto fields in your query results. This mapping integrates the identified entities into the Entities field in your alert schema.
Surface custom details in your alerts: Expand Custom details and define any fields in your query results you wish to be surfaced in your alerts as custom details. These fields appear in any incidents that result as well.
Customize alert details: Expand Alert details and customize otherwise-standard alert properties according to the content of various fields in each individual alert. For example, customize the alert name or description to include a username or IP address featured in the alert.
Schedule and scope the query.
Set the following parameters in the Query scheduling section:
Run query every: Controls the query interval: how often the query is run.
Allowed range: 5 minutes to 14 days.
Lookup data from the last: Determines the lookback period: the time period covered by the query.
Allowed range: 5 minutes to 14 days.
Must be longer than or equal to the query interval.
Start running Automatically: The rule will run for the first time immediately upon being created, and after that at the query interval.
At specific time (Preview): Set a date and time for the rule to first run, after which it will run at the query interval.
Allowed range: 10 minutes to 30 days after the rule creation (or enablement) time.
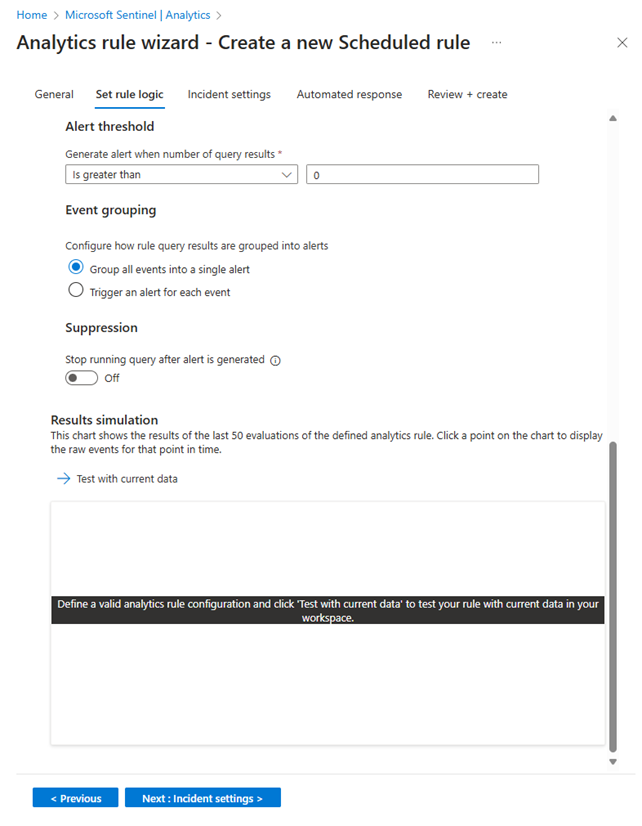
Set the threshold for creating alerts.
Use the Alert threshold section to define the sensitivity level of the rule. For example, set a minimum threshold of 100:
Generate alert when number of query results: Is greater than
Number of events: 100
If you don’t want to set a threshold, enter 0 in the number field.
Set event grouping settings.
Under Event grouping, choose one of two ways to handle the grouping of events into alerts:
Group all events into a single alert
(default): The rule generates a single alert every time it runs, as long as the query returns more results than the specified alert threshold above. This single alert summarizes all the events returned in the query results.
Trigger an alert for each event: The rule generates a unique alert for each event returned by the query. This is useful if you want events to be displayed individually, or if you want to group them by certain parameters—by user, hostname, or something else. You can define these parameters in the query.
Temporarily suppress rule after an alert is generated.
To suppress a rule beyond its next run time if an alert is generated, turn the Stop running query after alert is generated setting On. If you turn this on, set Stop running query for to the amount of time the query should stop running, up to 24 hours.
Simulate the results of the query and logic settings.
In the Results simulation area, select Test with current data to see what your rule results would look like if it had been running on your current data. Microsoft Sentinel simulates running the rule 50 times on the current data, using the defined schedule, and shows you a graph of the results (log events). If you modify the query, select Test with current data again to update the graph. The graph shows the number of results over the time period defined by the settings in the Query scheduling section.
Select Next: Incident settings.
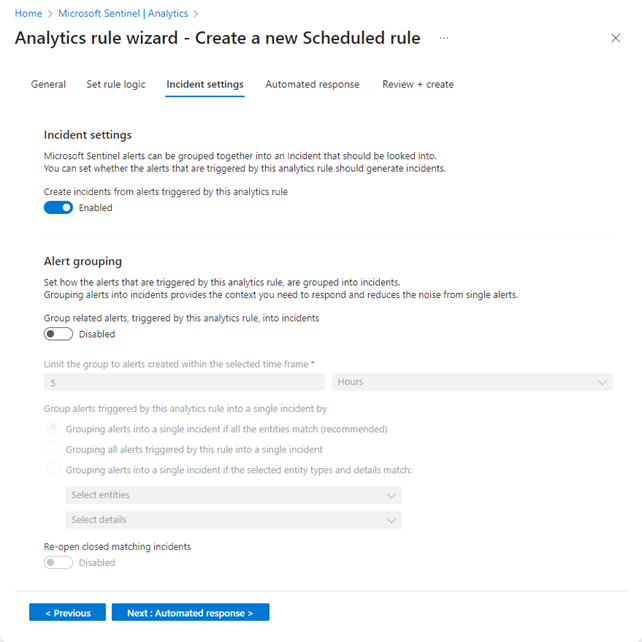
Configure the incident creation settings
In the Incident settings tab, choose whether Microsoft Sentinel turns alerts into actionable incidents, and whether and how alerts are grouped together in incidents.
Enable incident creation.
In the Incident settings section, Create incidents from alerts triggered by this analytics rule is set by default to Enabled, meaning that Microsoft Sentinel will create a single, separate incident from each and every alert triggered by the rule.
If you don’t want this rule to result in the creation of any incidents (for example, if this rule is just to collect information for subsequent analysis), set this to Disabled.
Set alert grouping settings.
In the Alert grouping section, if you want a single incident to be generated from a group of up to 150 similar or recurring alerts (see note), set Group related alerts, triggered by this analytics rule, into incidents to Enabled, and set the following parameters.
b. Limit the group to alerts created within the selected time frame: Set the time frame within which the similar or recurring alerts are grouped together. Alerts outside this time frame generate a separate incident or set of incidents.
c. Group alerts triggered by this analytics rule into a single incident by: Choose how alerts are grouped together:
Group alerts into a single incident if all the entities match: Alerts are grouped together if they share identical values for each of the mapped entities (defined in the Set rule logic tab above). This is the recommended setting.
Group all alerts triggered by this rule into a single incident: All the alerts generated by this rule are grouped together even if they share no identical values.
Group alerts into a single incident if the selected entities and details match: Alerts are grouped together if they share identical values for all of the mapped entities, alert details, and custom details selected from the respective drop-down lists.
d. Re-open closed matching incidents: If an incident has been resolved and closed, and later on another alert is generated that should belong to that incident, set this setting to Enabled if you want the closed incident re-opened, and leave as Disabled if you want the alert to create a new incident.
Select Next: Automated response.
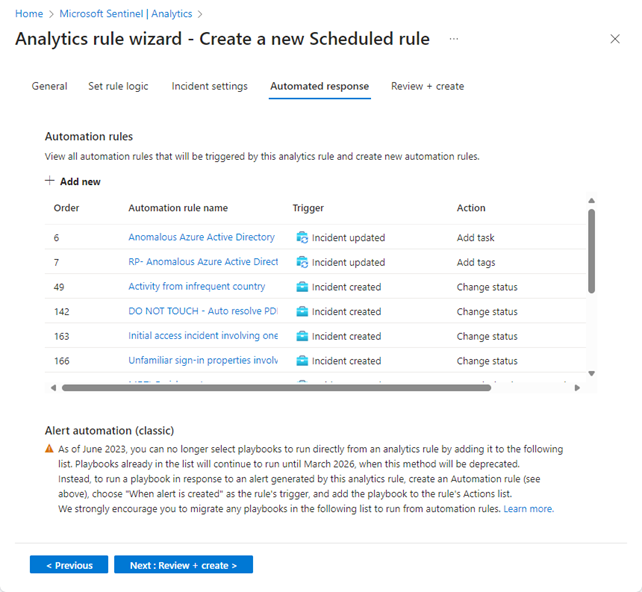
Review or add automated responses
In the Automated responses tab, see the automation rules displayed in the list. If you want to add any responses that aren't already covered by existing rules, you have two choices:
Edit an existing rule if you want the added response to apply to many or all rules.
Under Alert automation (classic) at the bottom of the screen, you'll see any playbooks you've configured to run automatically when an alert is generated using the old method.
If you still have any playbooks listed here, you should instead create an automation rule based on the alert created trigger and invoke the playbook from the automation rule. After you've done that, select the ellipsis at the end of the line of the playbook listed here, and select Remove. See Migrate your Microsoft Sentinel alert-trigger playbooks to automation rules for full instructions.
Select Next: Review and create to review all the settings for your new analytics rule.
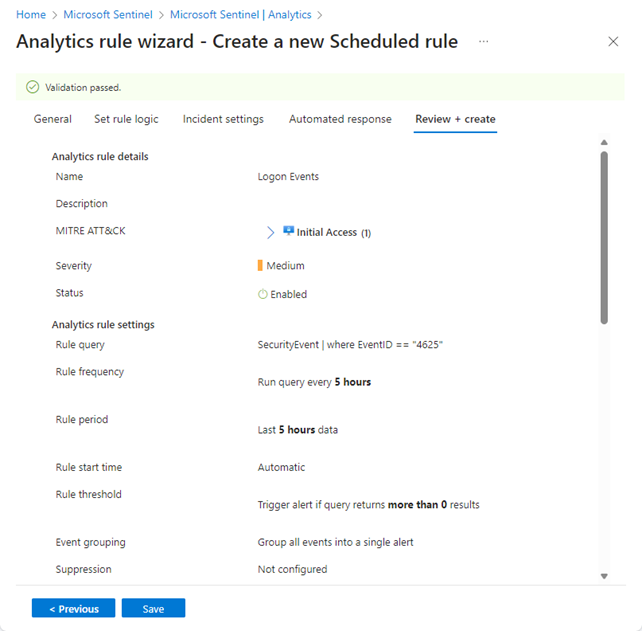
Validate configuration and create the rule
When the "Validation passed" message appears, select Create.
If an error appears instead, find and select the red X on the tab in the wizard where the error occurred.
Correct the error and go back to the Review and create tab to run the validation again.
What are the Benefits of Automating Response with KQL?
Automating response with KQL offers a multitude of benefits for security operations centers. Some of the key advantages include:
Increased Efficiency
By automating routine tasks and responses, SOCs can free up valuable time and resources, allowing security analysts to focus on more complex and strategic activities. This leads to a more efficient and productive security operation.
Faster Incident Response
Automation enables real-time detection and response to security incidents, significantly reducing the time it takes to mitigate threats. This rapid response is crucial in minimizing the impact of cyberattacks and preventing further damage.
Consistency and Accuracy
Automated responses ensure that predefined actions are executed consistently and accurately, reducing the risk of human error. This consistency is vital in maintaining a robust security posture and ensuring that threats are handled appropriately.
Scalability
As organizations grow and their IT environments become more complex, manual threat detection and response become increasingly challenging. Automation with KQL allows SOCs to scale their operations seamlessly, handling larger volumes of data and more sophisticated threats with ease.
My Recommendations
When utilizing KQL for automating response in your SOC, consider the following best practices to maximize its effectiveness:
Develop Robust Detection Rules
Create comprehensive and well-defined detection rules that cover a wide range of potential threats. Regularly review and update these rules to ensure they remain relevant and effective in detecting the latest attack techniques.
Leverage Machine Learning
Integrate machine learning models with your KQL queries to enhance detection capabilities. Machine learning can help identify anomalous behavior that may not be easily detectable through traditional rule-based methods.
Automate Routine Responses
Set up automated responses for common security incidents to ensure timely and consistent action. For example, automate the isolation of a compromised system or the blocking of malicious IP addresses to quickly contain threats.
Collaborate and Share Insights
Encourage collaboration within your SOC by sharing effective queries and insights. This collective knowledge can significantly enhance your team’s overall threat detection and response proficiency.
Conclusion
Automating response with KQL is a game-changer for modern SOCs, providing the speed, accuracy, and scalability needed to stay ahead of sophisticated cyber threats. By developing robust detection rules, leveraging advanced features like machine learning, and fostering collaboration within your team, you can maximize the effectiveness of KQL in your security operations. Embrace automation to enhance your incident response capabilities and ensure a robust defense against ever-evolving cyber threats.